Color Correction
One of the quickest and easiest ways to make your images look more professional is to apply some color correction to them. This could be anything from subtle adjustments to the contrast, all the way to completely altering the look and can have a huge impact on the mood and atmosphere of an image.
Pixeluvo contains many professional color correction filters to help you get just the right look. You can find them all in the Color menu at the top of the main window.
You can apply these filters to any bitmap layer and the result is calculated immediately. However, if you think you may want to come back and edit the parameters some time later, then it may be better to apply the filter as an adjustment layer. To learn more about adjustment layers and how to use them, see the page about Layer and Masks. All of Pixeluvo’s color correction filters are available as adjustment layers.
Quick Color
As its name suggests, the Quick Color filter can be used to very quickly adjust the color of an image.
Select from one of the high-quality presets to adjust the tone and color balance of the image. You can set the strength of the adjustment using the slider at the bottom. You can also add a simple vignette using the other slider (for a more advanced vignette effect, try Effects->Photo->Vignette).
Vibrance
The Vibrance filter adjusts the saturation of the colors in the image, literally making them more (or less) vibrant. Drag the slider all the way to the right to create a fully saturated effect, or all the way left to make the image monochrome.
Brightness/Contrast
With this filter you can quickly and easily adjust the overall brightness and contrast of an image. The histogram shows the relative distribution of color values in the image, which can be useful as guide whilst you are making adjustments.
Hue/Saturation
This filter allows you to separately alter the Hue, Saturation and Lightness of an image.
Curves
The Curves filter gives you absolute control over color transforms. It is an extremely powerful way of making adjustments and is well worth learning how to use.
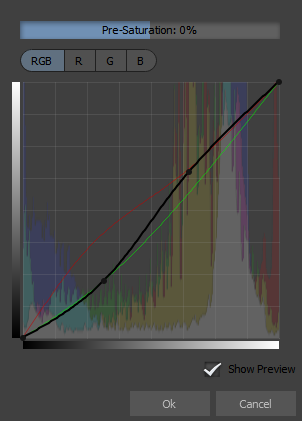 The Pre-Saturation slider at the top adjusts the saturation of the image before the curves mapping is applied. You can use this to achieve colorization effects by adjusting the R,G,B curves separately.
Beneath that are the channel buttons which control which channel curve is currently visible.
The curve area itself shows the mapping from input values (horizontal axis) to output values (vertical axis). For example, an ‘S’ shaped curve (something the one in black shown on the left), will increase the contrast in an image because it makes the dark input colors even darker (the left side of the curve is pushed down), and the brighter input colors even brighter (the right side of the curve is pushed up).
You can adjust the mapping curve individually for each of the R,G,B channels, as well as having an overall mapping curve acting on all of the channels.
Levels
The Levels filter allows you to set the input and output levels of each of the channels.
The input level slider sets the range of input values that are mapped to the output. The output level slider sets the range of values that will appear in the final output. The midpoint control in the input slider can be used to adjust the overall brightness of the image.
As for the curves filter, you can set the mappings for each channel individually, as well as combined.
Colorize
The colorize filter works by first desaturating the image, then adding color to the resulting black and white image.
You can set the hue by dragging around the color wheel. Drag the sliders for saturation and lightness to specify the final color used to colorize with. The blend slider controls the overall strength of the effect.
Monochrome
Use the Monochrome filter to quickly select from various monochrome presets such as sepia tone, or high contrast black and white.
Use the blend slider to set the overall strength. You can also add a simple vignette using the other slider (for a more advanced vignette effect, try Effects->Photo->Vignette).
Temperature
With the Temperature filter you can adjust the overall color temperature of the image.
Drag the slider to the right to increase the temperature (shifting the color balance towards the red end of the spectrum), and drag to the left to decrease the temperature (shifting the color towards the blue end of the spectrum).
Color Balance
Use the Color Balance filter to adjust the relative balance of hues.
The slider for Cyan/Red controls the balance between cyan and red tones. Drag the slider to the left to tilt the balance towards cyan and away from red, or to the right to increase the red and decrease the cyan. The sliders for Magenta/Green and Yellow/Blue work in the same fashion.
The buttons at the top for shadows, mid-tones and highlights allow you to adjust the color balance separately for these areas of the image. For example, you could increase the blue in the shadows, but decrease the blue in the highlights. This allows for an excellent level of control in tweaking the color tone of an image.
Replace Color
The Replace Color filter replaces a target color in the image with another color specified using the hue, saturation and lightness controls in the dialog.
Click anywhere on the image to set the target color that you wish to replace. Drag around the hue control and adjust the saturation and lightness controls to set the replacement color. The softness slider controls how much nearby colors are affected. A low value means only colors very similar to the target color will be replaced. A larger value will mean that a wider range of colors will be affected, with the effect fading out as those colors become more different from the target color.
Split Tone
The Split Tone filter allows you to separately tint the shadow and highlight areas of an image.
Set the tint hues by dragging around the color wheels. The saturation sliders control the strength of the tinting. The balance slider controls the balance between the shadow tint and the highlight tint. A lower value will bias towards the shadow tint, whilst a higher value will bias towards the highlight tint.
Cross Process
The Cross Process filter simulates cross-processing color film (that is developing film using a chemical solution intended for a different type of film). This results in an increase in contrast and shifting of colors.
You can adjust the intensity of the effect using the Strength slider.
Photo Filter
The Photo filter simulates placing a colored filter over the image. It can be used to remove color casts in an image, to warm or cool the colors in an image, or for special effects.
You can choose from a list of predefined filter-types, or select a custom filter color to use.
Invert
The Invert filter simply inverts each channel of the image. There are no options for this filter, so no dialog is displayed.
This filter is probably most useful when working with masks.
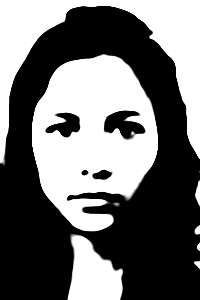
Threshold
The Threshold filter converts an image to black and white, depending on the luminance (brightness) of each pixel.
The threshold value controls which pixels in the output will become black, and which will become white. Input pixels with a luminance less than the threshold value will be mapped to black in the output, otherwise they will be white.
The softness slider controls the size of the transition area from black to white. Instead of simply jumping from black to white when the luminance crosses the threshold value, there is a smooth blend centered on the threshold value. The softness value controls the size of this blend area.
The Pre-Blur slider controls the radius of an optional blur applied to the image before the threshold (note this option is not available when the filter is applied as an adjustment layer). The following images show the effect of increasing the pre-blur value.