
Layers and Masks
Layers provide a powerful way to build up complex projects whilst keeping all the individual elements separately editable. Having masks attached to layers allows you to finely control which areas of a layer are visible.

The Layer Stack
Lets have a look at how you might build up an image using layers.
The layer panel shows all of the layers for a project in a stack. Click on the layers icon at the right of the options bar at the bottom of the screen to open it up. Here is the layer panel for the image above:
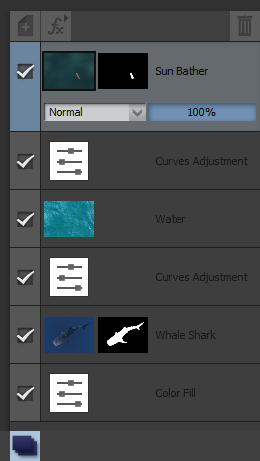
Layers are combined from the bottom to the top, each layer blending on top of the layers beneath it. In this example the bottom layer is a Color Fill adjustment layer, which simply fills the image with a solid color. On top of that layer is our whale shark image. This layer has a mask applied so only the shark is visible. The black areas of the mask are transparent, so they have no effect.
So far we have an image of a whale shark, cut out and blended on top of a solid color. The next layer up is another adjustment layer, this time adding a color correction to what is below it. This is there to make the shark less distinct, so it appears as if it is being viewed through the water. Above that layer is the surface of the water, with the waves texture on it. On top of that we have another color adjustment and then finally the sun bather floating on top of it all.
The benefit of structuring the image like this is that we can come back and edit the various elements separately at any time. We could move the position of the sun-bather, or scale up the shark, or even remove the shark completely and replace it with an image of a submarine. Using layers and masks in this way gives us enormous flexibility.
Types of Layers
There are three main types of layers in Pixeluvo. The most common one is a Bitmap layer. This simply holds a image, or part of an image. In the example above the whale, waves and sun bather layers are all bitmap layers.
Secondly you can have Adjustment layers. These typically apply some kind of color adjustment to the layers beneath. Because the image is composed from the bottom of the stack upwards, adjustment layers effectively operate only on the layers that are below it.
The final type of layer are Text layers. These hold editable text that can be moved around and re-edited as necessary.
Working With Layers
To create a new empty layer you can either click on the ‘New Layer’ icon in the top left of the layer panel, or use the menu Layer->New Layer. This will create a new layer above the currently selected layer. If you copy an image or part of an image to the clipboard, you can paste it into a new layer either within that same project, or into a different project. You can reorder the layers in the stack simply by dragging and dropping them. To delete a layer, make sure it is selected, then click on the trashcan at the top of the layers panel, or use Layer->Delete Layer. To rename a layer, simply double click on the name in the layer panel.
The currently selected layer is shown highlighted, and the blend mode and opacity controls are visible. This is the layer that you will act upon with any editing operations such as transforms, the painting tools, color corrections, effects and so on. It is important to make sure the correct layer is selected before you perform any of these operations, otherwise you will end up altering the wrong part of your image. When the layer panel is collapsed, you can still see and set the selected layer using the combo box in the options bar.
Blend Modes
As well as having an opacity control, which determines how strongly a layer is blended in, each layer can have its own blending mode.
The blend mode controls how colors are combined when one pixel is blended with a pixel from the layer below it. The default blending mode (called ‘Normal’) gives the result you may expect, where 100% opacity results in the color of the upper pixel with no color from the pixel below visible, and 0% opacity results in just the color of the lower pixel.
Without going into the mathematics of how the blending is done, the various blend modes can be grouped according to their general behavior.
The first group all darken the result in some manner. This group consists of the blend modes Multiply, Linear Burn, Color Burn and Darken.
The second group are effectively the inverses of the first group, and all lighten the result. This group consists of the blend modes Screen, Add (Linear Dodge), Color Dodge, and Lighten.
Next are a group of blend modes that both lighten and darken the image depending on the brightness. This group consists of Overlay, Soft Light, Hard Light, Linear Light, Pin Light and Vivid Light.
After that are three different blend modes that are in some way result in the difference between the two pixel values. These are Subtract, Difference and Exclusion.
Finally there are two blend modes that can be used to alter the color components of a layer. Luminance uses the brightness of the upper pixel and combines it with the hue and saturation from the pixel below. The Color blend mode is similar, except it takes the hue and saturation of the upper layer, and the luminance of the lower layer, so it can be used to apply a coloring to a gray-scale layer beneath.
The best way to learn how the various blend modes effect the result is simply to experiment with them, and take note of the many different kinds of effects that are possible.
Adjustment Layers
Adjustment layers can be used to make different kinds of color corrections in a non-destructive manner.
If you apply a color correction filter from the Color menu, the result is applied immediately once you confirm. In many cases this is perfectly acceptable and exactly what you want. However, suppose you continue to make edits to your image, and at a later time decide that you want to change the parameters for an earlier color correction you have made. With an adjustment layer, this is quite possible, you can keep adjusting the parameters even as you make further edits to your image.
To add an adjustment layer, select Layer->New Adjustment Layer from the menus, or click the ‘fx’ icon at the top of the layer panel. You can then select the type of adjustment you would like to make. It is possible to use any of the color adjustment filters as adjustment layers, but you can also add film grain, vignettes, and a range of fill types as an adjustment layer.
Adjustment layers have a blend mode and opacity controls just like bitmap layers, and they can also have a mask in exactly the same way as bitmaps layers. However, you can’t paint on an adjustment layer (although you can paint on it’s mask), or transform it like you can with bitmap layers.
To open up the controls for the adjustment filter, simply double click on its controls icon in the layer panel.
Merging Layers
Sometimes you will want to combine layers to conserve memory, or simply because you have finished editing them. You can do this by merging a layer onto the layer beneath it. There are a couple of things to be aware of when merging layers.
Firstly, since the result of merging layers is always a bitmap layer, the layer you are merging onto (the layer beneath the selected layer), must be a bitmap layer (that is, it cannot be an adjustment layer or a text layer).
Secondly, the result of merging two layers together like this may not always give identical results to keeping them separated. For example, if the two layers have different blend modes, then their combination may look different, as the combined result can only have a single blend mode (the blend mode of the lower layer is kept). Also, if one or both of the layers have masks, then again the combination may not match the original look, as the result can only have a single mask. In this instance the top layer will have its mask applied (if it has one) before it is merged down, and the mask of the lower layer (if present) will then be masking the combined result.
In most instances however, merging two layers will have no visual difference at all and the result will be identical.
Instead of merging the layers one at a time, sometimes you may just want to flatten the image into a single combined layer. To do this choose Layer->Merge All Layers. The result of this operation will always be identical to the unflattened version. If you wish to keep all the layers in addition to creating a flattened copy, you can do so by choosing Layer->New Layer From Merged. This will create a new layer with the result of combining all the other layers, without removing those other layers.
Using Layer Masks
Layer masks allow you to control which parts of a layer should be visible, and which should be ignored. Like selections, masks can have any value between those two extremes, where the layer will be partially visible.
To create a layer mask, select the layer you wish to add a mask to and then go to Layer->Add Mask. There are four options to choose from:
- Reveal All creates a mask with the whole layer initially visible, i.e. the mask is solid white.
- Hide All creates a mask with the whole layer set to invisible, i.e. the mask is solid black.
- Reveal Selection creates a mask from the current selection, which shows only the selected area.
- Hide Selection also creates a mask from the current selection, but inverts it, leaving the unselected areas visible.
You can also create a layer mask by clicking on the layer’s mask icon in the layer panel – which looks like this: ![]()
By default this will create a mask revealing the selection. If you hold Control when clicking that icon, it will create the inverse mask, hiding the selection. If there is no selection, the mask will reveal or hide the entire layer.
You can paint onto masks and apply filters to them just like ordinary bitmap layers. To do so you need to make the mask active, otherwise you will just be painting onto the main layer data. To make the layer mask active simply click on the mask preview in the layer panel. A black outline should appear around it, indicating that is it active. Now when you paint, or use any of the filters or effects, they will operate on the mask, not the layer data. To switch back to editing the main layer data, simply click on the layer preview, and the black outline should switch back, indicating that the main layer data is now active.
Saving Images With Layers
In order to save an image so you can load it later keeping all the layers intact, you will need to save it as a Pixeluvo project file (with extension .pxu). In contrast, most image formats don’t support saving an image with layers, so when you save to any other image format, only the flattened result obtained by combining all the layers is saved. When you reload this into Pixeluvo it will only have a single layer. So remember to save your work as a pxu file if you want to keep the layer information intact.