
Tools
Pixeluvo contains many advanced tools to help make creating the perfect image easier.
You can select the tools in Pixeluvo from the vertical tool bar on the left hand side of the main window. Hover your mouse over each icon to see the name of the tool and the keyboard shortcut.
Toggle down the descriptions below to see more information about the various tools available in Pixeluvo.
General Tools
Move Tool
You can use the move tool to position layers and text. By holding shift you can constrain the movement to horizontal and vertical changes only. You can also use the cursor keys to nudge the content for more precise control.
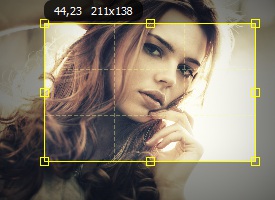
Crop Tool
Use the crop tool to chop out unwanted areas of an image. Simply click and drag to set the area you want to crop to. Drag the borders or use the cursor keys to make any necessary adjustments. Once you are happy with the size and positioning of the crop region, click “Crop” in the tool options bar to confirm (or simply press Enter). You can cancel a crop by clicking “Cancel” in the tool options bar, or by pressing Escape.
Text Tool
To add text to an image using the text tool, simply click where you want the text and start typing. You can select different fonts from the popup in the options bar. The usual settings for font size, bold and italic text, and alignment options can all be adjusted. Tip: Hold down shift while clicking on a font in the font list to preview the change without closing the panel. This allows you to quickly try out many different fonts. Text is stored in special text layers which remain editable. To re-edit text you have entered previously, make sure the relevant text layer is selected, activate the text tool by clicking on the ‘T’ icon (or pressing ‘t’), then simply click on the text you wish to alter to begin editing.
Warp Tool
You can use the warp tool to organically warp parts of images. The warp tool has three modes:
- Pull – Click and drag to pull pixels around. Use the mouse wheel to adjust the radius of influence as you do so.
- Scale – Click and drag to create a bulging effect. Drag to the right to bulge outwards, or left to bulge inwards.
- Rotate – Click and drag the mouse around to rotate the area under the brush.
Painting and Touch-up Tools
Brush Tool
The brush tool can be used for all manner of jobs, from simple photo touchups to complete digital painting.
The various brush options appear in the options bar at the bottom of the screen.
![]()
From left to right, the options that appear in the tool options bar are: Color, Presets, Brush Size, Brush Opacity, and Blend Mode.
Click the color swatch to open the color palette. You can also quickly sample colors from the canvas by holding Alt and clicking on the image.
Choose from a selection of high-quality presets by clicking on the brush preview icon.
 There are three pages of presets which can be cycled through by using the page dots at the bottom.
In order to fine-tune any of the presets, simply click the settings button at the bottom right. This brings up a panel with advanced settings. Here you can adjust all the brush parameters.
If you have a pressure sensitive graphics tablet you can also set which parameters are affected by pressure – for example, you can create a brush that fades out without changing in size with lighter strokes, or one that scatters the dabs more widely as you press harder.
You can adjust the size of the brush by dragging the popup slider in the tool bar, or more quickly by scrolling the mouse wheel over the image. You can also use the keyboard shortcuts ‘[‘ and ‘]’ to decrease and increase the brush size respectively.
The next slider controls the overall opacity of a stroke.
Finally you can set the blend mode by which the strokes are combined with the color on the canvas. These blend modes work exactly as they do for layers. See the layers and masks documentation for details about each blend mode.
By holding Shift and clicking on the image, you can draw a straight line from the end of the last stroke to the current mouse position.
Many of the controls for the brush tool are the same for the Erasor, Clone, and Spot Heal tools.
Erasor
You can use the eraser tool to remove color from the current layer, leaving it transparent in those areas. For details of the brush options, refer to the information above on the brush tool.
Clone Tool
The clone tool is used to clone parts of an image, copying them to other areas. This can be used to paint out unwanted items in the background, mask over flaws in the image, and many other common operations. First of all, you must select an area of the image to clone from. You can do this at any time by clicking on the target icon in the options bar, and then clicking on the image at the desired sampling position. You can also do this by simply holding Alt and clicking. Note that the source does not need to be on the same layer as the destination. To clone from a different layer simply make sure that layer is selected when you set the clone source, then switch to the desired destination layer before you start painting. Once you have a sample point defined, then you can begin cloning by simply drawing on the image. Areas from the source position are copied to wherever you paint. For details of the brush options, refer to the information above on the brush tool.
Spot Heal Tool
The Spot Heal Tool is useful for quickly removing small blemishes or spots from images. Simply paint over the spot to remove and watch as it is seamlessly painted out.
Dodge/Burn Tool
Use the Dodge and Burn Tool to quickly and accurately brighten (dodge) or darken (burn) regions of an image. Simply select the desired mode and strength and paint over the regions you wish to adjust.
Fx Brush
The Fx Brush Tool allows you to paint the effect of some common filters onto an image. This can be incredibly useful for touching up photos or applying effects in very specific portions of an image. The filters you can currently use to paint with are:
- Saturate
- Desaturate
- Colorize
- Blur
- Sharpen
- Surface Blur
- Boost Detail
- Boost Clarity
- Smooth Skin
Simply select the desired effect, adjust the effect settings in the options bar, then paint with the filter directly onto the image.
Red Eye Tool
Use the special Red-Eye Reduction Tool to quickly fix distracting red-eye artifacts that can be caused by a camera flash. Simply set the brush size and paint over the pupil to greatly reduce issues with red-eye.
Selection Tools
Lasso/Polygon Select
With the Lasso Select Tool you can create freehand selections to define areas for further processing. Click and drag to create a freehand shape, or click and release to create a polygonal selection. Click on the dot to close the selection. You can cancel a partially drawn selection by pressing Escape. You can set whether the tool should create a new selection, add to the current selection or subtract from the current selection by clicking on the icons in the options bar. Alternatively you can hold Shift to add to the selection, or Alt to subtract from it. The feather amount allows you to add a feather to the selection before it is combined with the current selection. For more information on selections, see the selections page.
Box Select
Use the Box Select Tool to create rectangular selections. Simply click and drag to set the corner positions. Hold Shift to constrain the selection to be a square. Hold Alt to scale the selection from the center. You can set whether the tool should create a new selection, add to the current selection or subtract from the current selection by clicking on the icons in the options bar. Alternatively you can hold Shift to add to the selection, or Alt to subtract from it. The feather amount allows you to add a feather to the selection before it is combined with the current selection. For more information on selections, see the selections page.
Ellipse Select
Use the Ellipse Select Tool to create elliptical selections. Simply click and drag to set the corner positions. Hold Shift to constrain the selection to be a circle. Hold Alt to scale the selection from the center. You can set whether the tool should create a new selection, add to the current selection or subtract from the current selection by clicking on the icons in the options bar. Alternatively you can hold Shift to add to the selection, or Alt to subtract from it. The feather amount allows you to add a feather to the selection before it is combined with the current selection. For more information on selections, see the selections page.
Magic Wand Tool
The Magic Wand Tool can be used to quickly select regions of similar color. Simply click to start the selection, then while holding the mouse button down, drag away to set the tolerance of the color matching. You can set whether the tool should create a new selection, add to the current selection or subtract from the current selection by clicking on the icons in the options bar. Alternatively you can hold Shift to add to the selection, or Alt to subtract from it. The feather amount allows you to add a feather to the selection before it is combined with the current selection. For more information on selections, see the selections page.
Fill Tools
Flood Fill
The Flood Fill Tool floods the selected color onto the image, in areas with similar color. Simply click to start the fill, then while holding the mouse button down, drag away to set the tolerance level. An interactive preview will show the area to be filled.
Gradient Fill
Using the Gradient Fill Tool you can create smooth gradients of color. Click and drag on the image set to the start and end points of the gradient. Click on the gradient preview in the options bar to open the gradient editor panel.  Here you can select from various gradient presets, or create your own. The preview at the top of the panel shows the node positions along the gradient. Click on a node to select it. Once a node is selected you can adjust its color and opacity. Click and drag the nodes to reposition them. To delete a node, make sure it is selected, then click on the trashcan icon. Click anywhere on the gradient strip to create a new node at that position. The next three icons in the options bar control how the gradient is calculated.
- Linear gradients run from the start to the end positions.
- Radial gradients radiate outwards from the start position.
- Angle gradients run in a circle around the start position.
You can also adjust the opacity and blend mode of the fill, and whether the gradient should repeat after the end point. The final option in the options bar swaps the start and end positions so the gradient will run in reverse.